Espresso Profiler for Rocket R60V
I've just released my 2024 summer project:
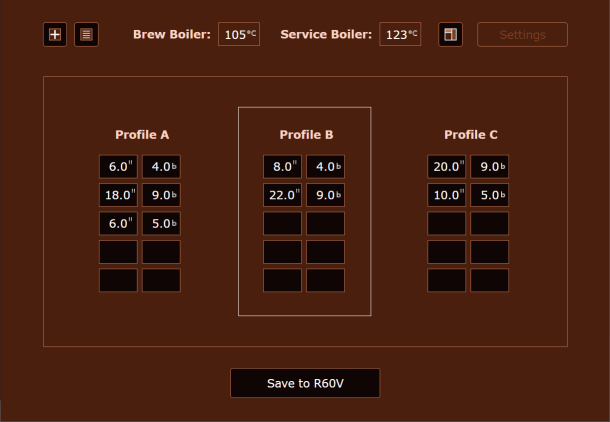
Espresso Profiler is a coffee app ready to use with Rocket R60V espresso machines.
The app is available for Windows and Mac computers, and links direct through your wi-fi.
If you've been wishing for an easy way to adjust Rocket R60V pressure profiles (and set auto-sleep and wake times, adjust system settings, save a library of profiles, among other features) I hope you'll give it a try.
You can learn more at www.espressoprofiler.com
Windows Bluetooth not connecting? This fix worked for me!
Is your Windows Bluetooth detecting devices, but not connecting to them?
That was a profoundly frustrating problem for me. It turned out to have a simple fix.
Before we get to that, I want to make sure that anyone searching on the same Bluetooth symptoms I saw have a good chance of finding this post. So, if you're running into issues like:
- Bluetooth not linking;
- Bluetooth will not connect;
- Bose QC35 II headset not connecting Bluetooth;
- Bluetooth mouse not connecting;
- Bluetooth can see device but will not connect;
- Bluetooth not working after Windows update.
then this might be the fix that will work for you.
What happened to me?
In my case, Windows Bluetooth just stopped working one day.
For no reason I could determine, Bluetooth devices refused to complete their connection when an attempt was made to link them through Windows.
I updated Bluetooth drivers, uninstalled/reinstalled Bluetooth drivers, removed devices from Windows Device Manager, then performed every last Windows, driver and BIOS update I could find. Alas, none of the 'fixes' I attempted resolved the issue.
Through it all, each Bluetooth device would be seen in Windows when choosing to 'Add Bluetooth or other device', but they would not connect.
So, Bluetooth was working, it was finding devices, but the devices refused to connect.
How did I spot the cause?
A check in Windows Event Viewer showed that each failed connection logged an error with source BTHUSB and Event ID 16.
The Windows Event Viewer error detail text stated:
The mutual authentication between the local Bluetooth adapter and a device with Bluetooth adapter address [device_address_here] failed.
In other words, Windows Bluetooth saw the device, but could not establish an authenticated connection.
What was the solution?
For me, the problem was found in the properties of two Bluetooth Windows Services.
Bluetooth services must have the "Log on as" property set to "Local Service". In my case, they had somehow changed to log on as "Local System account".
To correct that setting, follow these steps:
Open your Windows Services list;
Scroll to the Windows Services named:
Bluetooth Audio Gateway Service
Bluetooth Support Service
Select a service, open its Properties, then click the 'Log On' tab.
If you see "Local System account" set for the Log On option of either of those services:
Select the 'This account:' radio button option;
Enter in the This account field the text "Local Service" (without the quotes);
Leave the Password and Confirm Password fields blank;
Click Apply to apply the change;
Close the properties dialog;
Stop the service;
Restart the service.
Make that change to both the Bluetooth Support Service and (if present) the Bluetooth Audio Gateway Service.
For good measure, fully power off your computer, wait 30 seconds, then power on again.
With your computer restarted, check your Windows Services list and confirm both services are now set to Log On as "Local Service".
Now, try connecting your Bluetooth devices.
If you had the same issue that I did, you should now experience the miraculous return of your Windows Bluetooth connectivity.
Still have issues?
If your Bluetooth devices are still refusing to connect, I recommend opening your Windows Event Viewer.
In Windows Event Viewer, select Custom Views -> Administrative Events in the left-hand menu, then review the Error/Warning entries with Source of type BTHUSB. Under the General tab you will see a description of the error, and an internet search on that text may lead you to a solution.
Special thanks go to the author of this Reddit post:
https://www.reddit.com/r/techsupport/comments/kue3r3/headphones_not_connecting_via_bluetooth_to_my_pc/.
Of all the myriad Windows / driver doc pages and tech support forums on the internet, that single obscure comment on /r/techsupport was the only resource I found that isolated the cause of and solution to my Bluetooth connectivity issue.
How to Block an IPv6 Address Range
So, your server is receiving unwanted network traffic.
You'd normally add a new iptables rule and block the troublemaker. But this time, the source comes from a network set with an IPv6 address.
Wat do?
Who This Post is For
This post covers the absolute basics of dealing with IPv6 addresses. It delivers the bare-bones summary I had hoped to find when I searched for how to block IPv6 traffic.
If you want detailed information, the IPv6 Wikipedia Page is a good place to start.
But you don't want that, do you.
You want to:
- understand the syntax of an IPv6 address;
- learn how to specify an IPv6 address range; and
- see how to write an iptables rule that blocks an IPv6 address range.
At least I did. And now I know!
And, in a few minutes, you're going to know as well.
The Basics of IPv6
IPv6 syntax is similar to traditional IPv4.
Hexadecimal values are listed in order of network detail, with each four-byte group delimited by ":".
An address you'll often see is: 2001:db8::
That's not a special value; it's just a standard subnet chosen for IPv6 documentation. Think of it as the www.example.com of IPv6, or the equivalent of the 192.168.0.1 you might use for an IPv4 document.
We'll be using that 2001:db8:: subnet in the examples outlined here.
"But," you might ask, "isn't that example address a bit short for IPv6?"
Nope! The address is just written in IPv6 short form.
IPv6 Short Form
The IPv6 address 2001:db8:: can be fully written as:
2001:0db8:0000:0000:0000:0000:0000:0000
Leading 0s can be omitted. So, we can write a snipped equivalent of the above with:
2001:db8:0:0:0:0:0:0
Snipping further, ranges of 0s can be indicated with a double colon "::", like so:
2001:db8::
We can also snip out 0s in the middle of an address. For example, this address:
2001:0db8:0000:0000:0000:0000:0000:0045
can be written as:
2001:db8::45
The IBM documentation page at https://www.ibm.com/docs/en/i/7.4?topic=concepts-ipv6-address-formats does an excellent job of describing IPv6 syntax.
I recommend reading that page before continuing (it's very short -- it'll take you two minutes) to make sure you understand IPv6 syntax.
How to Specify an IPv6 Subnet
We now know how to write out one of the 340,282,366,920,938,463,463,374,607,431,768,211,456 possible IPv6 addresses.
Yeah, there are a lot. And we'll have to block many nefarious IPv6 subnets in the years to come.
IPv6 subnets are identified through the address's four-byte groups. So, just as we can write:
192.168.0.0/24
to indicate all IPv4 addresses from 192.168.0.0 to 192.168.0.255, we can write:
2001:0db8::/32
to indicate all IPv6 addresses from 2001:0db8:0000:0000:0000:0000:0000:0000 to 2001:0db8:ffff:ffff:ffff:ffff:ffff:ffff
Similarly, the notation:
2001:0db8:4567::/48
would indicate all IPv6 addresses from 2001:0db8:4567:0000:0000:0000:0000:0000 to 2001:0db8:4567:ffff:ffff:ffff:ffff:ffff
If you're wondering what /32 and /48 mean, this page about IPv6 subnetting does a fantastic job of explaining values for IPv6 slash "/" notation.
I recommend reading that page before continuing (again, it's very short -- you'll be done in minutes) to make sure you understand how IPv6 subnets are written.
Want to Test What You've Learned?
Of course you do!
This IPv6 Subnet Calculator will accept an entered IPv6 subnet and show the range of addresses it covers.
A few experiments there will confirm you've caught the basics.
How to Block an IPv6 Subnet
Now that we know how to specify an IPv6 subnet, how do we go about blocking it?
Why, using ip6tables, of course!
I'm assuming here that you're familiar with how to use the iptables tool to block unwanted IPv4 network traffic. If iptables is new to you, you'll find Linode's iptables tutorial a helpful guide to get started with the basics.
Using iptables, we could block traffic from the IPv4 address range 192.168.0.0 to 192.168.0.255 with the command:
iptables -A INPUT -s 192.168.0.0/24 -j DROPIn the same way, we can block all traffic from an IPv6 subnet using ip6tables.
Using our range example above, the IPv6 address range 2001:0db8:0000:0000:0000:0000:0000:0000 to 2001:0db8:ffff:ffff:ffff:ffff:ffff:ffff can be blocked using the ip6tables command:
ip6tables -A INPUT -s 2001:0db8::/32 -j DROPSimilarly, a more precise targeting of the IPv6 address range 2001:0db8:4567:0000:0000:0000:0000:0000 to 2001:0db8:4567:ffff:ffff:ffff:ffff:ffff can be blocked with:
ip6tables -A INPUT -s 2001:0db8:4567::/48 -j DROPYou can specify your subnet of choice using the examples covered above.
And That's It!
You're good to go.
You're armed and ready to block any IPv6 traffic dispatched to hassle your servers.
Good luck!
(Special thanks to demu.red's post about IPv6 range blocking at https://demu.red/blog/2016/09/blocking-ipv6-ranges-with-iptables/. That gave me a good starting point for figuring out the basics.)
Past Space Resource Papers
These old papers and abstracts came up in conversation, and I thought I'd surface them here from Google Scholar for easy blog reference.
The contents are decades old, but lunar matters are much the same. The major difference these days is that the ‘non-renewable resource' of scientific ignorance has diminished a bit.
So we've got that going for us, which is nice.
This list is in chronological order, and nowhere near complete. Three full lunar/asteroidal development papers for the Journal of the British Interplanetary Society seem to be tucked elsewhere, and there is a ridiculously extensive collection of presentations made through the years that are very slightly bending a shelf to my right.
If you'd like copies, just ask over a coffee or pint.
Commercial activities resulting from a lunar base - Charles D. O'Dale (1994)
British Interplanetary Society, Journal (ISSN 0007-094X)
vol. 47, no. 12, p. 549-554
Policy Considerations for Lunar Development - Charles D. O'Dale (1995)
Thirty Second Space Congress, Paper Session II-C (1995)
The International Lunar Base as a Foundation for Commercial Industry - Charles D. O'Dale (2000)
Proceedings of the Fourth International Conference on Exploration and Utilisation of the Moon: ICEUM 4
Public and Private Sector Coordination for Effective Lunar Resource Use - Charles D. O'Dale (2005)
Proceedings of the International Lunar Conference, 2005
Lessons from Earth: Experiences Which can Guide Lunar and Asteroidal Development - Charles D. O'Dale (2004)
Space Resources Roundtable VI
Using Secondary Objectives to Guide the Development of Lunar Industry - Charles D. O'Dale (2005)
Lunar Exploration Analysis Group (LEAG) (2005)