Post Archive for 2015
If you're using JSVC to run your Java daemon processes on Linux, watch out for the change in command options which come with upgrading your Linux distribution.
Shifting from Ubuntu 10.04 to 12.04 / 14.04 (which you should be doing now, as Ubuntu 10.04 reached end of life as of May 1st, 2015) is a simple enough process, but your Java daemons will likely refuse to start after your Linux upgrade completes.
There are two things to watch out for:
First off, if you're using OpenJDK, the Java path has changed between Linux distributions. Where the path was once at:
/usr/lib/jvm/java-6-openjdkIt is now set to be CPU-specific. For example, if running Ubuntu 12.04 / 14.04 on a Linode, you'll find your OpenJDK path is now at:
/usr/lib/jvm/java-6-openjdk-i386Any scripts you might have which referenced that old path for Java home will need to be updated, or else you'll be presented with a "Cannot locate Java Home" error when attempting to start your Java programs.
The second set of pitfalls relate to JSVC itself.
When calling JSVC, you may be presented with the error "JSVC re-exec requires execution with an absolute or relative path" when attempting to start your Java daemon. As described in that error message, it turns out the full path to JSVC now needs to be specified for the binary on daemon start. So, a command-line call to JSVC should use the full file-and-path of:
/usr/bin/jsvcrather than just a call to the jsvc binary by itself.
For one final, sneaky change which might trip you up, the working directory for your Java jar also needs to be defined in the JSVC call's options.
For previous versions of JSVC, simply changing to the desired working directory prior to running JSVC was sufficient to define the working directory for the daemon, but that is no longer the case. The working directory must now be explicitly set using the -cwd option of the JSVC command.
That might be a surprise to you if you've been reading the JSVC man page in an attempt to identify what has been going wrong with your JSVC-run Java jar, as it appears the -cwd option was mistakenly left out of the JSVC man pages. Until that JSVC man page omission has been corrected, I'd recommend a read of the command as documented at JSVC's apache.org page if you're looking for a full overview of the new JSVC / Commons Daemon functionality. You can find that page at:
http://commons.apache.org/proper/commons-daemon/jsvc.htmlThrough that page, you'll discover that JSVC will set your Java jar's working directory to be "/" if the -cwd option is missing (thanks to Arkain on StackOverflow for pointing that out!), which will likely mess up any file i/o in your daemon.
To summarize all of the above with an example of the changes you might need to make to your JSVC call:
If you had a script on Ubuntu 10.04 to start via JSVC a Java jar myJavaProgram.jar using the daemon interface startJSVCDaemonProcess with working directory myWorkingDirectory, running as user myUser and writing out a PID at myPIDFile.pid, your script might previously have read:
cd /srv/myWorkingDirectory

jsvc -user myUser -home /usr/lib/jvm/java-6-openjdk
-pidfile /srv/myWorkingDirectory/myPIDFile.pid
-cp /srv/myWorkingDirectory/myJavaProgram.jar
com.companyname.start.startJSVCDaemonProcess
To have the same functionality using the current JSVC / Commons Daemon under Ubuntu 12.04 / 14.04, you would need to change that script to read:
/usr/bin/jsvc -cwd /srv/myWorkingDirectory
-cp /srv/myWorkingDirectory/myJavaProgram.jar
-java-home /usr/lib/jvm/java-6-openjdk-i386
-user myUser -pidfile /srv/myWorkingDirectory/myPIDFile.pid
com.companyname.start.startJSVCDaemonProcess
By making those changes you will have:
- Called the jsvc binary using the full file-and-path;
- Edited the OpenJDK path for Java Home; and
- Added in the -cwd option to set the daemon's working directory.
You should then find your Java .jar daemon process running as before, but be sure to run your unit tests to confirm the environment change all the same.
With an Oculus in-hand, the first step was to see if I could somehow make an app which solved an actual problem for users of VR Headsets.
One of the first things I noticed was how easy it was to lose track of time in Oculus games, experiences and movies. Since a video overlay app didn't seem a good fit, using audio jumped out as a solution which wouldn't interfere with a person's VR experience.
The result? The Senomix VR Clock: A simple tool which responds to a user's headset taps and motions to announce time, sound/snooze alarms, and manage stopwatch and countdown timers.
Being audio, the app doesn't lend itself well to action shots, so this banner will have to do:
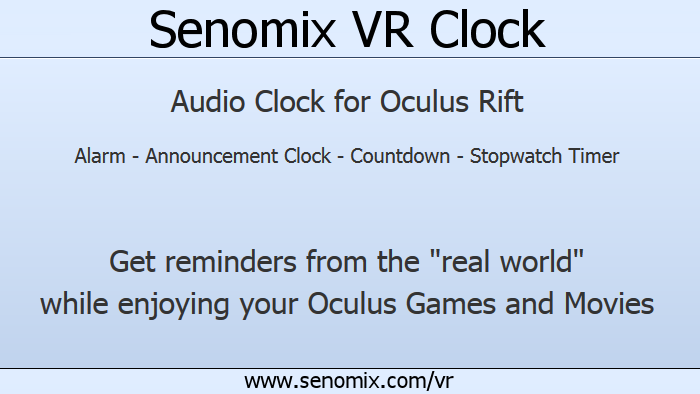
The app is just a beta release for now and is 100% free during the beta testing period. Cleanup of the initial audio recording and inevitable bugs will follow in the coming weeks (this is a true v0.1.0 beta release, rough bits and all) but, if you have an Oculus, I hope you'll give it a try and let me know what you think!
You're checking your Apache logs one morning and you're finding WebLogExpert taking a bit longer than usual to create your activity report.
That's strange. Maybe the log file was corrupted?
Checking your day's log, you find the file is over a dozen times larger than usual. Multiple megabytes over the usual size. After opening the file in your text editor, you find it full of nonsensical blank entries. Tens of thousands of lines of this:
[IP Address Removed] - - [21/Sep/2013:00:01:08 +0000] "POST / HTTP/1.1" 301 499 "-"
 "Mozilla/4.0 (compatible; MSIE 6.0; Windows NT 5.1; SV1)"
[IP Address Removed] - - [21/Sep/2013:00:01:08 +0000] "POST / HTTP/1.1" 301 499 "-"
 "Mozilla/4.0 (compatible; MSIE 6.0; Windows NT 5.1; SV1)"
[IP Address Removed] - - [21/Sep/2013:00:01:09 +0000] "POST / HTTP/1.1" 301 499 "-"
 "Mozilla/4.0 (compatible; MSIE 6.0; Windows NT 5.1; SV1)"
[IP Address Removed] - - [21/Sep/2013:00:01:10 +0000] "POST / HTTP/1.1" 301 499 "-"
 "Mozilla/4.0 (compatible; MSIE 6.0; Windows NT 5.1; SV1)"
[IP Address Removed] - - [21/Sep/2013:00:01:10 +0000] "POST / HTTP/1.1" 301 499 "-"
 "Mozilla/4.0 (compatible; MSIE 6.0; Windows NT 5.1; SV1)"
[IP Address Removed] - - [21/Sep/2013:00:01:11 +0000] "POST / HTTP/1.1" 301 499 "-"
 "Mozilla/4.0 (compatible; MSIE 6.0; Windows NT 5.1; SV1)"
[IP Address Removed] - - [21/Sep/2013:00:01:12 +0000] "POST / HTTP/1.1" 301 499 "-"
 "Mozilla/4.0 (compatible; MSIE 6.0; Windows NT 5.1; SV1)"
Uh, oh. For some reason, out of nowhere, a huge amount of garbage traffic has been arriving at your web site. Each an empty POST request, with the requests arriving from hundreds of different IP addresses.
Checking your web server's status through your control panel, you see a spike in CPU activity showed up along with those empty POST requests, making your report look something like this:

And your web server's disk i/o has also spiked:
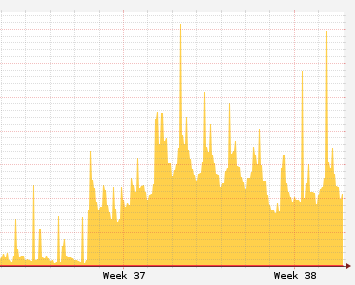
It's not noticeably slowing your web site down yet, but it looks like that spike in activity is going to continue growing and it will soon affect your web site's performance. One way or another, seeing your web server spike in activity for absolutely no reason can't be good.
Is someone attacking? Is this the start of a denial of service? A prelude to some kind of cyber-extortion?
Congratulations. You've just found yourself the latest 'winner' of the Pushdo lottery.
Huh? Pushdo?
Before we start explaining how to fix things, let's take a look at the problem's cause.
You've probably heard of botnets: Networks of 'zombie' computers taken control of by viruses and joined together to do a variety of nasty things, from sending spam email to attacking web sites and taking them offline with huge bursts of traffic. The traffic you're seeing on your web site now is coming from one of those botnets. This one's referred to as Pushdo.
As explained through that link, the Pushdo botnet is an infrastructure of sorts to handle various computer crime tasks and, to hide its activity, it constantly blasts out traffic to make it difficult to spot the center of command for its work. Your web server is now receiving one of those bursts of network traffic.
For one analogy, you can think of Pushdo acting like a thief who has zombified the population of a small town to help hide his crimes. Using his zombie powers, the thief sets up thousands of people to constantly walk a city's streets and stumble into its buildings and houses. The zombies continue to stumble along, day and night, so that whenever the thief wants to rob a bank, he can just stumble off and quickly blend in with the crowd. Sure, the city streets would grind to a halt as those thousands of zombies milled about 24 hours a day, but it would be reasonably easy for the thief to perform whatever crime he'd like and then slip away in the crowds, stumbling along with the rest of the zombies.
That 'needle in a haystack' situation is similar to what you're experiencing with Pushdo. Your web server has become a house filled with zombies, with Pushdo stuffing it full of web site traffic arriving from thousands of computers to hide its activity from anyone who might try to figure out which computer was sending meaningful criminal information to the other.
Pushdo isn't attacking your web site directly, and your web server (probably) isn't infected with Pushdo itself. Your site is just an innocent bystander being used to hide activity.
So, why was your site chosen? Simple bad luck, really. Your site was one of hundreds picked at random from the world's DNS records, and now you're the target of traffic from thousands of botnet computers.
How Do I Stop This Surge in Zombie Traffic?
The bad news is, you can't stop the surge itself and it's probably going to continue hammering your web site for the next few months -- possibly the next few years. Pushdo will continue to hide its activity by using your web site as a random target and it will only stop once your site rotates off the list of zombie destinations used for camouflage.
However, while you can't stop the traffic at its source, you can configure your web server to ignore the traffic as it arrives. The tens of thousands of zombie messages will still come knocking at your web site every day, but you can set your computer to block those messages the moment they arrive on your network and keep them from reaching your web server.
To do this, you'll need to set up a firewall rule to block all traffic which fits the Pushdo message signature.
Using iptables to Block Pushdo
We're assuming here that you're running your own web server on Linux, either as a stand-alone computer or through a hosted VPS package with Linode, Slicehost or another provider. If your web site is instead being managed by a full-service hosting provider, your best action would be to contact your server support team and have them apply the appropriate traffic-blocking actions for you.
Continuing with the assumption that you're running your own web server on Linux and have full control over that computer, here's an overview of how to fix your Pushdo problem:
To block the zombie network traffic bombarding your web server, you're going to use iptables. The iptables utility is a network packet filter which you can use to regulate internet traffic. Linode provides an excellent overview of the package in their documentation, and the raw help text for the tool can also be reviewed direct through the "man iptables" command on your server computer.
Watch out! Since a mis-configuration of iptables can also block legitimate traffic (even your own login), you will want to review the documents linked above to gain a better understanding of exactly how the utility works before applying the examples given here. It's really easy to accidentally set iptables to block all network traffic arriving on your web server and, since such a mistake would block any attempts you might make to fix things, that could lead to irreparable disaster. Trust me: It's worth the extra bit of effort to look over the documentation and understand at least the basics before proceeding.
Have you read those guides over? Good. Let's put them to work.
In reviewing those documents, we can see that it's very easy to configure iptables to block individual IP addresses. That's really helpful if there's a particular nuisance source of traffic you'd like to block but, in this case, the Pushdo traffic is arriving from many thousands of different IP addresses and it would be extremely tedious to enter a blocking rule for each of them every time a new address showed up.
What we're going to do instead is block the arriving traffic based upon its contents. As you might have noticed when examining your Apache logs, all of the Pushdo traffic has the same general signature of:
[IP Address Removed] - - [21/Sep/2013:00:01:08 +0000] "POST / HTTP/1.1" 301 499 "-"
 "Mozilla/4.0 (compatible; MSIE 6.0; Windows NT 5.1; SV1)"
For all of the messages received, there's a consistent POST command of either:
or
'POST / HTTP/1.0'
So, if we can detect that particular bit of text in a received packet, and that text is not used in any legitimate traffic accepted by your web server, we can safely set up a rule to block anyone sending a message which contains that particular blurb of text.
Ah! But your own web site might have legitimate traffic with that same signature! Before implementing this particular fix (which worked for us, as there were no legitimate POST requests on our own web server which were blank), you will want to search through your past Apache logs to confirm the text being scanned for is not used by legitimate visitors to your site. If it is, you would best select additional criteria to examine for blocking the message (for example, adding in the 'MSIE 6.0; Windows NT 5.1; SV1' bit, since blocking users of IE 6 who send along POST requests is probably not going to nab legitimate traffic).
The iptables Commands to Use For Blocking Pushdo
To block the two snippets of text identified above, you will want to apply the following iptables rules as root (preferably, using sudo):
iptables -I INPUT -d [your web server IP address] -p tcp --dport 80 -m string --string
 'POST / HTTP/1.1' --algo bm -j DROP
iptables -I INPUT -d [your web server IP address] -p tcp --dport 80 -m string --string
 'POST / HTTP/1.0' --algo bm -j DROP
Where [your web server IP address] is the IP address of the web server computer on which iptables is running.
Taking a look at the contents of that command, this is what it is doing:
iptables : running iptables
-I : inserting a rule
INPUT : for packets going to local sockets
-d [your web server IP address] : heading to the computer with this IP address
-p : now, here comes the rule:
tcp -dport 80 : for tcp traffic arriving on port 80
-m string : use the string module
-string 'POST / HTTP/1.1' : so that any traffic matching the string 'POST / HTTP/1.1'
-algo bm : which we're identifying using the Boyer-Moore (bm) string-matching algorithm
-j DROP : will immediately jump to the DROP rule the moment it's spotted.
After applying those rules to iptables, any network activity spotted which contains the text 'POST / HTTP/1.1' will be dropped immediately, closing your web site's door to those zombies.
So, What Next?
With the iptables rules applied, you're done. Pushdo traffic will still come knocking at your web server with zombie traffic, but iptables will prevent that traffic from entering your web site. You can confirm that by checking your web server's log files a few minutes after applying those rules: You should see the blank POST entries suddenly stop.
Your computer will still show higher CPU and disk I/O usage than usual, it just won't be as bad as it could have been and (with luck) won't noticeably affect the performance of your web site. For one example, the charts shown in the earlier part of this article display the result of applying those iptables rules the day Pushdo traffic first arrived on our site. In our case, there was an initial dip in CPU usage as the first round of Pushdo traffic was handled, followed by a surge as the real torrent of zombies arrived. Our iptables utility was kept pretty busy that month, but website performance was not affected.
Remember: Your iptables rules will be cleared out after every reboot of your web server, so you must be sure to apply those rules after every reboot. If you don't yet have a checklist of steps to follow whenever rebooting your web server, now would be a good time to create one.
Your iptables rules will need to remain in place until Pushdo moves on from your web site, and that will probably be quite some time. I'd recommend adding a note to your server reboot checklist reminding you to leave out your Pushdo iptables rules every three months to see if that unwanted traffic has disappeared. After rebooting your web server with those rules removed, you can then check your Apache logs after an hour to see if those telltale blank POST messages are still appearing.
You should find that the Pushdo traffic drops off in intensity after about six months but still remains in place for a bit over a year after its first appearance. However, one day it will disappear completely and, when that day comes, you can stop applying those iptables rules to your web server.
Be patient. Being a target of Pushdo is a pain, but there's nothing that can be done about it but to batten down your web server's ports and leave iptables to do its filtering job.
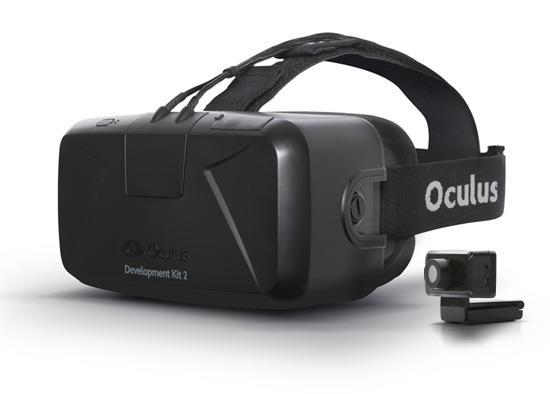
Here are my impressions after having the Oculus Development Kit (DK2) in-hand for a bit over two weeks now:
The Technology Behind Oculus
The hardware itself will be familiar to anyone who has developed software for a touch screen phone. Described generally, the head-mounted display is a cell phone screen placed in a headset mount. A gyroscope, magnetometer and accelerometer provide instrumentation, with an accompanying camera used to identify the position of the wearer's head. In all, the DK2 seems a perfect example of innovation, where the device introduces no new technologies but is instead a recombination of existing parts to create something wholly new.
That doesn't in any way diminish how much of a marvel the device is, but it does suggest that, as with cell phones, VR headsets are likely to drop in price when created in volume and may be expected to improve in quality at a rapid pace.
Oculus Immersion
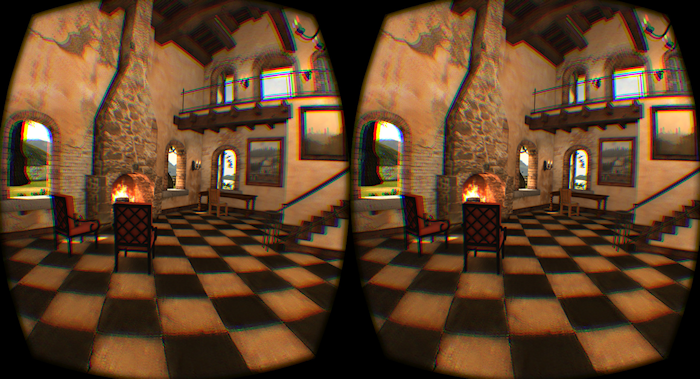
The screen's low resolution does produce a bit of a 'screen door' effect, with the LCD pixels very easy to see. The sensation is a bit like sitting too close to an old CRT television set. Since the DK2 is a prototype development kit (and not the final product) that lower image quality wasn't surprising, and I found the immersive experience of the headset allowed me to very quickly dismiss quibbles about resolution.
The sense of presence is very effective. Even with the 'seated at a desk' test display, I found myself reaching out to confirm that what I saw on the desk before me wasn't actually there . It's clear that the environment one is looking at is a set of video game graphics, but one's mind is easily convinced that what is being seen is actually real.
Along with that immersion, an awareness of my actual surroundings disappeared almost entirely at times, and I sometimes found myself startled to feel my hands touch a desk or chair when my eyes saw open air around me. I'm not sure if I would trust myself walking with a VR headset, and it will be interesting to see how Steam VR overcomes that sense of displacement from reality with their own plans for a headset which encourages standing, mobile user operation.
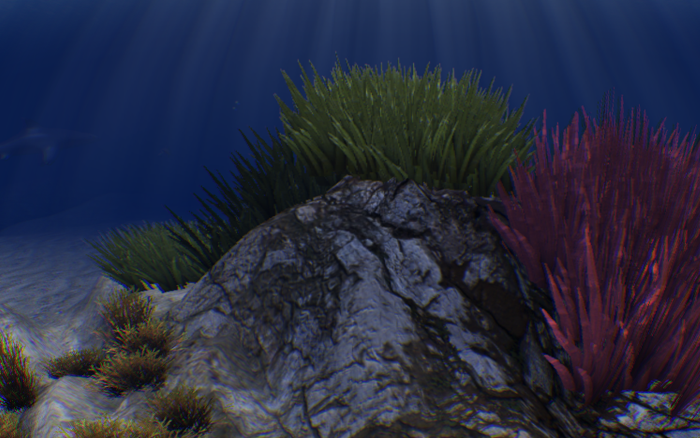
In the virtual environment, I felt a sense of apprehension whenever deliberately putting myself in danger. For one example, when swimming about in the Ocean Rift demo, I was reluctant to descend into the depths where the giant shark (which you're warned about) was waiting to attack. Even though I was obviously not really swimming beneath the waves and diving deep into a dark ocean trench, it was a spookily genuine experience all the same. Given my uneasiness with something so tame and G-rated, there is no way in hell I'd play a horror game like Alien Isolation in VR.
It will be interesting to see if that sense of dread diminishes once my brain becomes accustomed to the VR environment and learns about a new thing it can safely ignore. I remember telling my friends about the sense of total immersion I felt playing a pixelated 3D Quake, 640x480, on a 14 inch monitor, and I can't help but wonder if my initial Oculus experiences will sound just as exaggeratedly real when looking back on this technology in the future.
Surprisingly, the various roller coaster demos (which famously freak people out) did very little for me. I'm the type of heights-dreading person who feels apprehension just watching a parkour video and ends up with sweaty palms after playing a game like Mirror's Edge on a regular monitor, but I found the Oculus roller coasters to be a bit underwhelming. I suspect that will change once issues of judder and resolution are resolved.
Oculus Nausea
The nausea experienced when first using the DK2 was surprisingly intense. Just a few minutes of wandering around the low-intensity Tuscany Villa demo had me feeling queasy, and about 10 seconds flying in the AirDrift demo almost made me vomit. Regardless of the settings or passiveness of the environment, for the first few days it was not possible for me to use the DK2 for more than a few minutes at a time. An extended period of use would see me wearing the device for no more than 10 minutes, and only with tremendous effort.
The nausea was of a surprisingly intense and persistent sort. Whenever I've experienced motion sickness when playing games, the sensation tended to grow gradually and quickly diminished once I'd left the computer screen. However, VR sickness seemed to onset immediately and persisted for a bit over two hours after I'd left the device behind. A sense of dizziness and unsteadiness remained after taking off the DK2, and I'd recommend anyone looking to try a VR headset ensure they're not needing to operate machinery or a vehicle for a few hours after their first attempt -- I'd never have trusted myself in a car or on a bike at that point.
The nausea and dizziness was so intense at first that I was concerned I would not be able to use VR at all. Fortunately, this has turned out not to be the case.
One quickly learns not to change position too quickly while wearing the VR headset. The sensation when swiftly turning my virtual body's view about was as if blood were being pressed to the side of my brain to cushion it from a sudden shock. Whether that was an illusion or an actual reaction from my nervous system is something I'll leave to the biologists and physicians, but the unpleasantness of the experience was very real.
I gained my 'VR legs' rather quickly and the discomfort was considerably reduced after a week of occasional use. Nausea diminished with each session using the DK2, and use of it for extended periods (30+ minutes) after about 10 days barely registered any sense of discomfort at all. It then became possible to skip through the various Oculus demonstration apps with ease and play games for an hour or so at a time without any difficulty. Flying in AirDrift became a breeze. Use of the device soon began to feel so natural that I would have likely misremembered my earlier nausea as being considerably less intense if I'd not made notes about it at the time.
It's unclear to me whether my diminishing nausea was due to my senses growing accustomed to the VR environment, or my having optimized my computer's drivers and configuration to ensure the DK2 was being used in the best possible fashion. Others who have tried the DK2 device on my computer after I had finished its configuration and video driver optimization experienced no nausea issue whatsoever. So, either I should have spent more time configuring my system's drivers and DK2 configuration before starting to use the device, or I was just an unlucky outlier who was particularly susceptible to VR motion sickness.
Gaming With Oculus
The Direct to Rift mode for the DK2 worked flawlessly, with all games and tech demos suited for that mode running without issue. However, setting up Extend Desktop mode on my own computer to use Steam was a difficult experience which reminded me of the 'DLL hell' presented when installing a video card on Windows 3.1. That difficulty is no fault of Oculus or any other hardware/software vendor: The DK2 is beta development hardware, and my difficulties could have come from a variety of sources, from video card drivers to my monitor setup under Windows. I only mention these issues as a reminder that the DK2 is not consumer hardware: Everything might work for you right out of the box at this point, but anyone who purchases a DK2 should be prepared to spend a good amount of time configuring their system to ensure it works correctly.

Once Extend Desktop mode was enabled for my DK2, I tried out Half-Life 2 using Steam's beta VR client and found the game a new experience entirely. The screen door effect is still there, with pixels visible when you're looking for them, but the sensation of actually feeling 'inside' the game allowed me to quickly set that roughness aside. Even though the game was familiar to me, the VR immersion allowed me to pick out scenery details I'd not seen before, and I gained a sense of scale of my surroundings which had previously been missing -- I had no idea head crabs were so big!
Video With Oculus
Virtual movie theaters and home entertainment setups seem to be one of the most popular initial applications of VR displays, and I believe video will end up becoming the most popular use of the Oculus and similar devices in the future. Even early in my use of the device, I did not feel nausea when using the DK2 to passively view video and that use seems likely to be the gateway through which wider adoption of VR headsets will occur.
The ability to set whatever environment one would like for movie viewing (whether in a living room, your choice of theater and row, or just a floating screen), combined with the full sense of immersion and lack of interruption from the outside world delivered by the headset provides the possibility of a perfect movie experience. A VR display delivers the option of viewing regular two-dimensional or fully 3D video in whatever format one would like, whether an IMAX-sized screen, a fully surrounding 3D environment, or a small corner television set, all while remaining seated or reclined in a favourite chair, couch or bed. The low resolution of the DK2 still delivers the feeling of sitting a bit too close to an old CRT television, but the higher resolution to be expected from the consumer Oculus device will likely resolve that distraction entirely in time.
There is also the possibility of interactive movies, or fully 360' degree movie experiences which put you in the role of a character of your choice. The Birdy King Land Oculus demo gives a really good example of that -- you're a character IN the movie. However, as fun as interactivity and gaming is with the Oculus, easily delivered passive entertainment seems likely to become the 'killer app' for head-mounted VR displays. Often, people just want to lie back and relax, and a personal, isolated virtual movie theatre has the potential to perfectly deliver that experience on-demand.
Oculus Tips From Experience
If I could go back in time to the moment I started using the DK2, I'd give myself these bits of advice:
You should use the Rift configuration tools to set your Inter-Pupillary Distance (IPD) rather than using the value measured for your glasses. IPD for the Rift (and presumably other VR headsets) should match the value used when your eyes are focused to infinity (informally confirmed here by Oculus Founder Palmer Luckey), which is what the configuration tool provides. Using the IPD value set for your glasses will probably be incorrect.
Ensure your video drivers are up to date. If using an NVidia card, install and use the NVidia 'GeForce Experience' tool to simplify the upgrade of your video drivers. It saves a lot of hassle when identifying and applying the correct driver version.
Contact lenses are helpful but not necessary if you can see well without glasses. With natural eyesight, I would be incapable of reading a cell-phone held at Oculus distance from my eyes, but the corrective optics of the device's lenses extend that distance to remove any difficulty with viewing. VR resolution isn't sharp enough yet to justify concerns with fine visual detail, but that will probably change with consumer versions of the device.
Be sure to move slowly in the VR environment. If you're used to flicking the mouse around for a quick change in orientation in first-person shooter games, using the same gesture to move about in VR will probably feel uncomfortable at first and lead to nausea.
If you're taller than average, set the Player Height value in the Oculus settings to be lower. The people creating Oculus games and experience demos are likely to be of average height, and the environments will often feel uncomfortably cramped (as if you're about to hit your head on the ceiling) if they are set to take into account player height. Just set your configuration height at 5'5" and you're good.
Should I Buy An Oculus Rift DK2?
If you're looking to develop VR software right now then, yes, you should buy an Oculus DK2. You should be prepared to fiddle with system settings, drivers, incomplete documentation and the other hassles which come with being on the 'bleeding edge' of a technology, but the device is good to go for development.
If you're considering the development of VR software, are curious about the experience or just want to play games with the system, you should wait. The consumer versions of the Oculus Rift are going to be superior to the development kits in pretty much every way, and might even be less expensive at first. It will be worth the anticipation to wait a few more months for those to arrive since, once consumer versions of VR headsets are available, the early implementations now available with the Oculus DK1 and DK2 are probably going to be set aside to gather dust.
Update: This blog post discusses building a simple C++ app for the Oculus v0.5.0 beta SDK. An updated example which shows how to build a simple C++ console app for the production Oculus Rift CV1/DK2 v1.3.2 SDK can be found here.
__
This post walks through the basics of building a simple C++ app for the Oculus Rift Development Kit 2 (DK2). Setup of the development environment is covered first, with the coding of a simple app which reads the device's sensors and outputs their state following after.
We're working with the Oculus Rift 0.5.0 SDK for this example and a DK2 device. Everything posted in here is subject to change as the Oculus API matures (that's no fault of Oculus -- we were all told we're getting a work-in-progress developer kit, and that's what's been delivered), so please do let me know if these notes no longer reflect reality for a developer new to the device.
Oculus DK2 Dev Environment Setup
If you've not already installed the Oculus Rift SDK, you'll want to do so now. It is also assumed for Oculus development that the DirectX SDK and Windows SDK are already installed on your computer. We won't need those SDKs for the initial 'Hello World!' completed here but will definitely need them later, so best to fetch those before starting to code.
The DirectX SDK can be retrieved from here:
http://www.microsoft.com/en-us/download/details.aspx?id=6812
And the Windows 8.x SDK (which works fine for Windows 7) from here:
https://msdn.microsoft.com/en-us/windows/desktop/bg162891.aspx
It turns out that the DirectX SDK installer can conflict with the Microsoft Visual C++ 2010 Redistributable, resulting in a cryptic "Error Code: S1023" installation failure. If that happens to you (as it did to me), this StackOverflow post will sort you out.
Microsoft Visual Studio (VS2013) is used as the development environment for the examples shown here. To test that environment after all SDKs are installed (and give us a VS2013 project into which we'll put our example code) we'll start out with a traditional 'Hello World!' program.
Using the VS2013 File > New > Project... wizard to create a new console app (being sure to turn off the "Precompiled header" checkbox option), we'll pop into the editor:
#include <iostream>

int main()
{  std::cout << "Hello World!";
   return 0;
}
and then use the VS2013 Build > Build Solution menu option to create an executable.
With "Hello World!" output to the console when running that exe, we've confirmed our development environment is good to go. Onwards to the DK2!
The Oculus developer documentation is a bit vague on the libraries needed for the basics, and the code examples included with the SDK cover a good amount of DirectX and other extra bits we're not needing just yet. Checking the Oculus developer forums, the latest news on libraries tells us that the only ones needed for the linker are:
libovr.lib (libovrd.lib in debug)
Winmm.lib
ws2_32.lib
We're just working with the Oculus SDK for now, so the libovr.lib and libovrd.lib alone will be sufficient.
Continuing with our simple 'Hello World!' project environment, we'll add in the libovr.lib and libovrd.lib libraries through the VS2013 project's properties (right-click the project for the Properties dialog selection) under Linker > Input > Additional Dependencies, adding in the file and path for those two .lib files. On my own system, those were under:
e:\OculusSDK\LibOVR\Lib\Windows\Win32\Debug\VS2013\LibOVR.lib
e:\OculusSDK\LibOVR\Lib\Windows\Win32\Release\VS2013\LibOVR.lib
Your own path, of course, will depend upon the installation location of your Oculus SDK.
Next, we'll include the Oculus SDK.
In VS2013 again, under the project's properties, Configuration Properties > C/C++ > Additional Include Directories options, we'll set the path to the SDK's LibOVR Include, which could be found on my own system at:
e:\OculusSDK\LibOVR\Include
Our development environment is now ready to create our basic Oculus program.
Starting Oculus DK2 Coding
To get a feel for how an Oculus program works, I opened up the Tiny Room sample code included with the SDK and...

It's been a while since I last worked in C++ and that sample code felt more unfamiliar than I was comfortable with. Before going any further, it was back to school for me.
The full MIT Open Courseware introduction to C++ class is available online, and stepping away from things to read the full lecture notes and coding up the assignment basics provided just the refresher I needed. If it's been a while since you've coded in C++, I'd recommend completing that course yourself to scrape the rust off your knowledge.
With that done, back to Oculus.
The Oculus Developers Guide provides an example initialization of the device through this snippet:
// Include the OculusVR SDK
#include <OVR_CAPI_0_5_0.h>
void Application()
{
   if (ovr_Initialize(NULL))
   {
      ovrHmd hmd = ovrHmd_Create(0);
      if (hmd)
      {
         // Get more details about the HMD.
         ovrSizei resolution = hmd->Resolution;
         ...
            // Do something with the HMD.
            ...
            ovrHmd_Destroy(hmd);
      }
      ovr_Shutdown();
   }
}
Let's put that into working code.
Using the above example for reference, we'll confirm we can connect to the DK2 by initializing the device and fetching its product name and firmware version. That's accomplished with this bit of code:
#include <iostream>
#include <OVR_CAPI_0_5_0.h>

using namespace std;

int main()
{  if (ovr_Initialize(NULL))
   {  ovrHmd hmd = ovrHmd_Create(0);

      if (hmd)
      {  // Output some attributes of the HMD.
         cout << "Connected to HMD with name " << hmd->ProductName
              << " and firmware version " << hmd->FirmwareMajor << "."
              << hmd->FirmwareMinor << endl;

         ovrHmd_Destroy(hmd);
      }

      ovr_Shutdown();
   }

   return 0;
}
With the DK2 turned on (look for the orange light on the headset), running the exe compiled from the above gives us the device's attributes output to console:
Connected to HMD with name Oculus Rift DK2 and firmware version 2.12So far so good. Now we'll try reading some sensor data.
Referencing the Oculus Developer Guide again, under the Head Tracking and Sensors section we can see how to start up the DK2's sensor and read in the tracking state. Putting all that into code with a loop to push out the results gives us:
#include <iostream>
#include <iomanip>
#include <OVR_CAPI_0_5_0.h>

#define COLW setw(15)

using namespace std;

int main()
{  if (ovr_Initialize(NULL))
   {  ovrHmd hmd = ovrHmd_Create(0);

      if (hmd)
      {  // Start the sensor which provides the Rift's pose and motion.
         ovrHmd_ConfigureTracking(hmd, ovrTrackingCap_Orientation |
                                       ovrTrackingCap_MagYawCorrection |
                                       ovrTrackingCap_Position, 0);
         ovrTrackingState ts;
         ovrSensorData sensorData;
         ovrVector3f gyroData;
         ovrVector3f magData;

         while (true)
         {  // Query the HMD for the current tracking state.
            ts = ovrHmd_GetTrackingState(hmd, ovr_GetTimeInSeconds());
            // Fetch the sensor data.
            sensorData = ts.RawSensorData;
            // Retrieve the gyroscope and magnetometer numbers.
            gyroData = sensorData.Gyro;
            magData = sensorData.Magnetometer;
            // And output the lot to console.
            cout << "Gyro (x,y,z):  " << COLW << gyroData.x << "," << COLW
                 << gyroData.y << "," << COLW << gyroData.z
                 << "  Mag (x,y,z): " << COLW << magData.x << "," << COLW
                 << magData.y << "," << COLW << magData.z << endl;
         }

         ovrHmd_Destroy(hmd);
      }

      ovr_Shutdown();
   }

   return 0;
}
With the output to console being:
Gyro (x,y,z):     -0.000476604,     0.00169012,    -0.00504548  Mag (x,y,z):
       -0.347324,       -1.14652,       0.548826
Gyro (x,y,z):      0.000524145,   -0.000410698,     -0.0029435  Mag (x,y,z):
       -0.347324,       -1.14652,       0.548826
Gyro (x,y,z):     -0.000476467,     -0.0026112,     0.00245846  Mag (x,y,z):
       -0.347324,       -1.14652,       0.548826
Gyro (x,y,z):       0.00162392,    -0.00471226,     0.00245943  Mag (x,y,z):
       -0.349417,       -1.13972,       0.558212
Gyro (x,y,z):      -0.00477799,   -0.000411771,    0.000259385  Mag (x,y,z):
       -0.349417,       -1.13972,       0.558212
Gyro (x,y,z):      -0.00157782,     0.00278784,    0.000260718  Mag (x,y,z):
       -0.339885,       -1.14628,       0.573855
Gyro (x,y,z):     -0.000477026,      0.0027865,    0.000261538  Mag (x,y,z):
       -0.339885,       -1.14628,       0.573855
Gyro (x,y,z):       0.00052226,     0.00168425,    -0.00393636  Mag (x,y,z):
       -0.339885,       -1.14628,       0.573855
Gyro (x,y,z):      0.000522759,    -0.00361625,    -0.00183387  Mag (x,y,z):
       -0.339885,       -1.14628,       0.573855
Gyro (x,y,z):     -0.000478059,     0.00168509,    -0.00293224  Mag (x,y,z):
       -0.340583,       -1.14769,       0.551232
Gyro (x,y,z):     -0.000479875,     0.00598387,    0.000268184  Mag (x,y,z):
       -0.340583,       -1.14769,       0.551232
Gyro (x,y,z):       0.00591569,     0.00278188,    0.000269853  Mag (x,y,z):
       -0.341512,       -1.15074,       0.550511
Gyro (x,y,z):       0.00161441,    0.000581309,    -0.00392838  Mag (x,y,z):
       -0.341512,       -1.15074,       0.550511
Gyro (x,y,z):     -0.000486488,   -0.000418246,    0.000274017  Mag (x,y,z):
       -0.341512,       -1.15074,       0.550511
Gyro (x,y,z):      0.000512119,     0.00168321,    -0.00292529  Mag (x,y,z):
       -0.348022,       -1.14464,       0.555083
Success! The DK2's sensors are being read and updating to reflect the device's orientation. 'Hello World!' is accomplished.
Now, to get my head around the Tiny World sample code...